Google Safe Browsing warnings and “This site may be hacked / contains malware” messages are terrifying for website owners: traffic drops, users bounce, ads and monetization stop, and your brand reputation takes a hit. The good news: with a disciplined, documented cleanup and the correct review request, you can usually get the warning removed — and recover traffic — within days to weeks.
This guide explains common causes for Google blacklisting, gives a step-by-step removal playbook you can follow now, provides a sample review request you can copy-paste, and shares SEO recovery tips to restore traffic after cleanup.
Quick overview — What Google blacklists and why
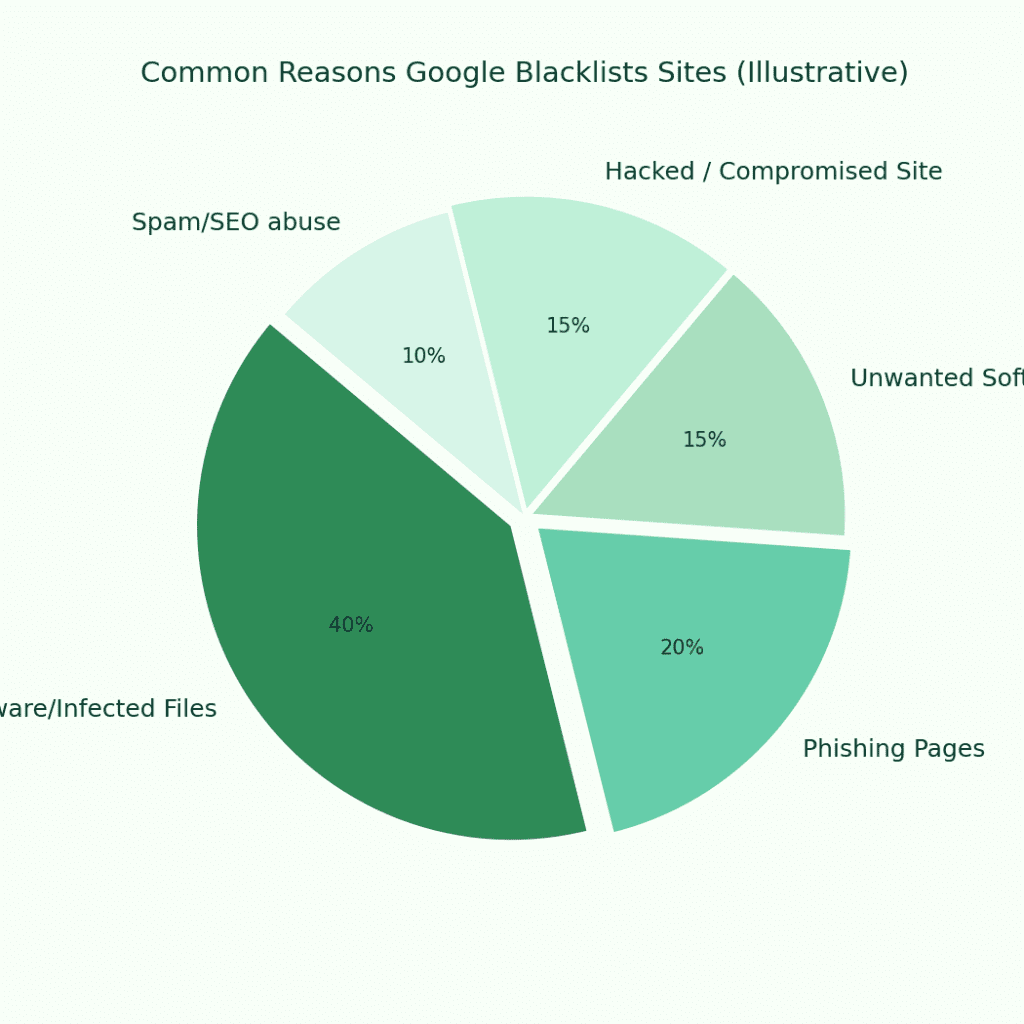
Google’s Safe Browsing system protects users by flagging sites that:
-
Host malicious software (malware): code that infects visitors.
-
Serve phishing pages: pages that steal credentials or payment details.
-
Distribute unwanted software (PUPs) that behave maliciously.
-
Are compromised (site hacked) and used to host spam, redirects, or backdoors.
-
Have been abused for SEO spam, doorway pages or deceptive content.
Immediate consequences of a blacklist: organic traffic drop (often 50–90% for pages that ranked), search console warnings, ad network suspensions, customer trust erosion.
How to confirm you’re blacklisted
-
Open Google Search Console (GSC) → Security Issues (if you have the site verified).
-
Try visiting your site in Chrome — often you’ll see “Deceptive site ahead” or “Site ahead contains malware.”
-
Use Google Safe Browsing diagnostic:
https://transparencyreport.google.com/safe-browsing/search?url=YOURSITE -
External scanners (SiteGuarding, SiteCheck, VirusTotal URL) for independent confirmation — note they might lag behind Google’s flag.
Step-by-step removal playbook (fast, defensible)
This is the practical playbook I recommend. Follow it in order and document every action — Google likes to see evidence.
Step 0 — Immediate containment (first hour)
-
Put site in maintenance mode (show a simple notice).
-
If ecommerce, set clear banner and email support to manage expectation.
-
Snapshot a full backup (forensically) — do not modify it.
Step 1 — Obtain the evidence (diagnose)
-
Check Google Search Console → Security Issues and Manual Actions.
-
Download the list of affected URLs and samples from GSC.
-
Scan with at least two independent tools (Sucuri, VirusTotal, SiteCheck).
-
SSH into server and run file modification checks (recently changed files).
-
Look for suspicious admin users, scheduled tasks (cron), .htaccess redirects, obfuscated code (
eval(base64_decode(etc.).
Useful file checks (server):
Step 2 — Identify Indicators of Compromise (IoCs) & scope
-
Collect IoCs: malicious file paths, IPs that uploaded files, suspicious database entries, injected JS snippets, redirect URLs.
-
Map affected pages and subdomains. Export a list for the review request.
Step 3 — Clean the site (remove threats)
-
Remove malicious files (backdoors, obfuscated PHP) and infected pages.
-
Restore core files from a clean CMS copy (e.g., fresh WordPress core).
-
Replace plugins/themes with fresh copies from official repositories.
-
Clean database of injected content (search for suspicious
<iframe>,<script src=...>, suspicious admin users, and spam posts). -
Rotate all passwords (admins, FTP, DB, API keys). Revoke all active sessions.
Step 4 — Harden & patch
-
Patch CMS, themes, and plugins. Remove unused plugins/themes.
-
Disable file editing (
DISALLOW_FILE_EDIT). -
Fix file permissions (directories 755, files 644, wp-config 600).
-
Block execution in upload directories.
-
Enforce two-factor authentication for admins.
-
Review cron jobs and remove unknown scheduled tasks.
Step 5 — Defensive measures (prevent reinfection)
-
Install a WAF (Cloudflare, Sucuri, ModSecurity rules) to block exploit attempts and virtual patch known plugin holes.
-
Add file integrity monitoring (alert on unexpected file changes).
-
Tighten logging and monitoring.
Step 6 — Build evidence & request a Google review
Prepare a precise review request (see sample below). Provide exact remediation steps taken and proof.
Step 7 — Post-removal monitoring & SEO recovery
-
Monitor GSC daily for messages.
-
Scan the site regularly for 30–90 days.
-
Submit removal request and wait (often hours to days).
-
After removal confirm search result snippets are normal; resubmit sitemaps.
Sample Google Review Request — copy / paste ready
Use this as a template in Google Search Console → Security Issues → Request Review. Keep it factual, concise, and include timestamps and proof links (screenshots).
What to expect after you request removal
-
Google review can take from a few hours to several days. If the issue was limited and proof strong, it’s usually faster.
-
If Google finds residual issues, they will reopen the ticket and give specifics — repeat the remedy cycle and re-submit.
-
Keep iterative logs of what you changed; transparency speeds reviews.
SEO recovery tips post-cleanup
-
Confirm delisting & re-crawl: After removal, ask Google to fetch & render and resubmit sitemaps.
-
Audit key landing pages: Ensure meta descriptions and titles haven’t been altered; canonical tags intact.
-
Restore lost links and outreach: If third-party sites removed links due to the blacklist, contact them with proof of cleanup.
-
Monitor rankings & traffic: Use Google Analytics and GSC to track recovery; set alerts for sudden drops.
-
Rebuild trust signals: Re-enable ads, submit to malware scanners, and publish a site security update for users.
-
Use structured data & revoke stale search snippets: If malware injected spammy snippets, use the URL removal tool for cached snapshots and request re-indexing.
-
Run a content & UX audit: Ensure no doorway pages or low-quality content remains that could prolong ranking penalties.
-
Malware removal & secure cleanup: 1–7 days (depends on scope).
-
Google review and delisting: a few hours to 14 days (typically 24–72 hours if clean).
-
SEO recovery (traffic bounce back): weeks to months; quick wins often in 2–6 weeks for core pages, full recovery can be longer if many links/PR were lost.
Prevention: Stop being blacklisted again
-
Keep CMS, plugins, dependencies up-to-date.
-
Limit administrative privileges & enforce 2FA.
-
Deploy WAF and file integrity monitors.
-
Regular backups with offline copies.
-
Scheduled automated scans + periodic manual security audits.
-
Use managed hosting or security services if you lack internal expertise.


